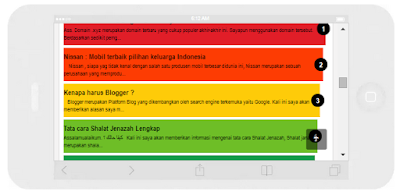
Kali ini saya akan membagikan Tutorial Bagaimana cara membuat Widget Popular Post Warna warni Kira kira seperti gambar dibawah.
/* Custom CSS for Blogger Popular Post Widget */
.PopularPosts ul,
.PopularPosts li,
.PopularPosts li img,
.PopularPosts li a,
.PopularPosts li a img {
margin:0 0;
padding:0 0;
list-style:none;
border:none;
background:none;
outline:none;
}
.PopularPosts ul {
margin:.5em 0;
list-style:none;
font:normal normal 13px/1.4 “Arial Narrow”,Arial,Sans-Serif;
color:black;
counter-reset:num;
}
.PopularPosts ul li img {
display:block;
margin:0 .5em 0 0;
width:50px;
height:50px;
float:left;
}
.PopularPosts ul li {
background-color:#eee;
margin:0 10% .4em 0;
padding:.5em 1.5em .5em .5em;
counter-increment:num;
position:relative;
}
.PopularPosts ul li:before,
.PopularPosts ul li .item-title a {
font-weight:bold;
font-size:120%;
color:inherit;
text-decoration:none;
}
.PopularPosts ul li:before {
content:counter(num);
display:block;
position:absolute;
background-color:black;
color:white;
width:30px;
height:30px;
line-height:30px;
text-align:center;
top:50%;
right:-10px;
margin-top:-15px;
-webkit-border-radius:30px;
-moz-border-radius:30px;
border-radius:30px;
}
/* Set color and level */
.PopularPosts ul li:nth-child(1) {background-color:#E11E28;margin-right:1%}
.PopularPosts ul li:nth-child(2) {background-color:#FD3C03;margin-right:2%}
.PopularPosts ul li:nth-child(3) {background-color:#FECB09;margin-right:3%}
.PopularPosts ul li:nth-child(4) {background-color:#6EBE27;margin-right:4%}
.PopularPosts ul li:nth-child(5) {background-color:#149A48;margin-right:5%}
.PopularPosts ul li:nth-child(6) {background-color:#5BBFF1;margin-right:6%}
.PopularPosts ul li:nth-child(7) {background-color:#61469C;margin-right:7%}
.PopularPosts ul li:nth-child(8) {background-color:#863E86;margin-right:8%}
.PopularPosts ul li:nth-child(9) {background-color:#863E62;margin-right:9%}
.PopularPosts ul li:nth-child(10) {background-color:#815540;margin-right:10%}


